Showing posts with label eyeshadows. Show all posts

Wednesday, November 27, 2013

New Hauls: Makeup from Drugstore.com


This is a delayed haul post. Actually I have a ton of delayed haul posts. I really wonder if i should post them. xD

Here's some stuff I got from drugstore.com during one of their sales that I can't remember. I really did minimise my order.


From left to right: L'Oreal Infallible Eyeshadow in Perpetual Purple, 
Maybelline EyeStudio Color Tattoo 24Hr Eyeshadow in Bad to the Bronze, Tough as Taupe, 
Maybelline Fit Me! Concealer in Medium 25

Bought Maybelline EyeStudio Color Tattoo 24Hr Eyeshadow as there were huge raves for them. (I'm so late into this). Got them in Bad to the Bronze and Tough as Taupe since I figured cream eyeshadows don't keep well in our weather so basic colours are probably the best. I love these. These are really nice and I would recommend them. I use Tough as Taupe just to lightly define my eyelids on lazy days.

Got L'Oreal Infallible in Perpetual Purple. I haven't opened this yet but I've swatched this in Watsons stores so many times. I really love the colour payoff of these I feel like buying all the colours. The thing that make me a little cross is they labelled the eyeshadow colours in Singapore as green, blue, purple, gold while online, these have completely differently colour names.

I also ordered a couple of Maybelline concealers but most were out of stock. :\ I'll probably try to order again. Now the Maybelline Fit Me! Concealer in Medium 25 is something i decide to try after watching MakeupGeek's rave about it on Youtube. I ordered a shade up so that it'll cover my dark eye circles. A quick review. Now it is darker than I expected. I think it will fit those NC30+ girls. It also seems orange-based for this shade which makes sense if you want a peachier shade to use as corrector for your dark eye circles. The consistency of this concealer is actually liquidy and easy to use. The concealer is pretty good though it still isn't strong enough to cover my dark eye circles. I do think many others with less serious dark eye circles problems would enjoy the light-weightness of this product. It's really cheap too. I think it was USD$6.

A little rant here. Do you know how much a L'Oreal liquid concealer cost in Singapore? It costs SGD$19.90. I can buy 3 of those.

Anyway hope you enjoy it. I'll be back shortly.


Saturday, May 21, 2011

New Hauls: Watsons Members' Preview Sale

Sorry for the lack of updates. I was too caught up following Singapore General Election 2011. Politics has always been the last thing in my mind so I'm pretty shocked by my interest. It is taking a long while for the emotions to sink in. I just feel so exhausted.


Went for Watsons Members' Preview Sale on 18 May. Some of the items had discounts up to 20% + 10% off.

Finally picked up Majolica Majorca Puff de Cheeks in OR302 Apricot Macaron. Had wanted PK 301 Peach Macaron too but it was sold out.


Also picked up 2 items from K-palette that I wanted to try out. There wasn't any testers for this.

I got the K-palette 1 Day tattoo 24Hr Real Lasting Eyeliner in Super Black and 24Hr Real Lasting Eyebrow Liner in 02 Greyish Brown. The K-Palette Eyeliner won BEST Liquid Eyeliner for 2010 in Singapore Women's Weekly 'Best Beauty Buys' award .


Picked up a lip balm from Mentholatum too. I've been using Mentholatum lip balms since young. Don't find them to be very moisturising but I heard this is really good so giving it a try.


Watsons was selling ZA bundled packs for $10, which is quite a good deal.

In one set, you get a ZA Eyes Vibrant eyeshadow trio in E10, a ZA Dramatic Eye Color quad in Green, a ZA Wide Eyes Mascara in Rose (I just realised the mascara is not black -.-').

For the other set, you get 2 ZA Pure Shine Lips in 01 Violet Visions and 02 Rose Toffee. These are really sheer and have tiny glitters.


I think there was also a set for ZA foundations but I missed it. I got these 2 sets since I kept missing out the ZA deals whenever I go Watsons. Not too sure how these items are. I wished there were choices for colour. :\ (What am I going to do with a rose-coloured mascara?!?!)

Other than that, it's really a good deal.

I think I'll end here.

Sunday, March 27, 2011

Review: Stila Collectible Travel Palette No. 1: Road to Radiance - Across the USA

Did some swatching so here's a quick review.


What it is: Follow this Stila Girl around the world and get five complete looks!What it does: Road to Radiance is the first in a five-part series of collectible palettes. It includes Stila's award-winning eyehadows in four trend-setting shades: Snow Bunny (shimmery champagne), Southern Belle (mauve), Valley Girl (pink), and City Chick (alloy). The palette also includes Convertible Color in "Hibiscus", a limited-edition shade, and a built-in mirror for easy application and touch-ups on the go.

What else you need to know: Born and raised in Los Angeles, Kylie is at a career crossroads. She's an educated, intelligent, and passionately creative twenty-something with the entire world at her fingertips. She's also a free spirit and wary of being held back by a 9-to-5 job. So on a whim, Kylie jumped in her car and decided to live out her life-long dream of crisscrossing the USA, discovering her native country, and finding herself along the way. Join Kylie on the journey of a lifetime, as she travels across the country and uncovers twelve of America's most interesting cities. She mingles with the residents, immerses herself in local culture, and-of course-shares her travel itinerary with you!


From left to right: Snow Bunny, Southern Belle, Valley Girl, City Chick, Convertible Color in Hibiscus

After swatching, I realised I haven't really tried out this palette yet. The eyeshadow pigmentation for this palette was a little disappointing. Basically each swatch takes two swipes to get colour out of it.Snow Bunny is more of a sheer silverish white highlighter, Southern Belle is a sheer greyish mauve , Valley Girl is a very sweet pink. They all have some form of shimmer in it. City Chick is a matte burgundy brown.

But I was really impressed by the Convertible Color in Hibiscus. It's a sweet rosey pink. It's actually super pretty. Kind of surprised I didn't notice it earlier. The Convertible Color doubles as blush and a lip tint. It blends really well so I'm really liking this.


Stila Collectible Travel Palettes retail for USD$10 but I don't think these are still available on their website or in stores anymore. Try Ebay or Amazon if you are interested in picking one to try out.

Friday, March 11, 2011

Review: VOV Castledew Extreme Pearl Up Eyes

I bought the VOV Castledew Extreme Pearl Up Eyes online a while back. Been wanting to try out some of the eyeshadows from the range because I've read some raves about it, especially their palettes.

I picked up VOV Castledew Extreme Pearl Up Eyes in VL331 Midnight Deep Violet and VOV Castledew Pearl Up Eyes in 9933 Glam Gold.

From left to right: Extreme Pearl-Up Eyes in VL331, Pearl-Up Eyes in 9933

If you are wondering how the eyeshadow packaging looks like, it looks like this. Couldn't snap a proper photo without the shiny surface reflecting off all the light. The packaging does have a cheap plastic feel but looks really pretty like a gem.


From left to right: Extreme Pearl-Up Eyes in VL331, Pearl-Up Eyes in 9933

VL331 Midnight Deep Violet is a medium purple shade with visible microglitters. But when applied, the glitters don't show up as much. It's a really pretty pearly purple shade. Love it.

9933 Glam Gold is no doubt pretty but a little disappointing for me. I was expecting more of a pearly champagne gold but it's more of a pearly beigey gold. It goes on looking like my eyelid colour. Would work well as an all over eyelid shade or highlighter.

From left to right: Extreme Pearl-Up Eyes in VL331, Pearl-Up Eyes in 9933
I actually really enjoy these eyeshadows and was super happy when I got these since they are so pretty. Both colours have decent pigmentation. If you like eyeshadows with pearl finishes, definitely check out the range.

I got these off Gmarket. John Little Singapore carries the VOV brand but I've yet to check whether these VOV Castledew eyeshadows. Will definitely get more if I see them.

Sunday, October 03, 2010

Tips: Eyeliner and Eyeshadow for Different Eye Shapes

The color that is mostly used is black but there are other shades available like brown, purple, blue, etc.
In order to really enhance your eyes you need to apply the eyeliner according to the shape of your eyes.

Here are some tips to help your eyes look gorgeous with eyeliner:

For Wide Set Eyes
Apply the eyeliner on your upper and lower lid from the inner corner of the eyes working your way towards the outer third of the eye. Use a lighter color eyeliner to line the outer corner of the eye if you desire. This method will create a visual effect which will make your eyes appear closer together.

For Close Set Eyes
Apply the eyeliner from the outer corner of the upper and lower eyelids, working your way towards the third of the inner corner. Do not line the inner corner of your eyes because it will make your eyes appear even closer.

For Small eyes
Apply a lighter shade of eyeliner which gradually thickens from the inner corner of the eyes towards the outer corner. Using a white eyeliner line the water line because it will help brighten up the eyes in order to make them look bigger.

For Droopy/Down Turned Eyes
Apply the eyeliner close to the eyelashes from two third of the eye towards the outer corner, gently sweeping the line upwards to create a cat eye effect. This will create a lifting effect for your drooping eyes.

For Almond Shaped Eyes
Apply the eyeliner only on your upper lid from the inner towards the outer corner of the eye. This will enhance your beautiful eye shape.

For Asian Eyes
Apply the eyeliner on your upper lid from the two third inner corner of the eye towards the outer corner and on the lower lid apply the eyeliner on the entire lid from the inner towards the outer corner of the eye.

Source: link


Other entries:
1. Tips: Application for Different Eye Shapes

Thursday, April 29, 2010

Review: NYX Eyeshadow Base


Ok, I've finally finished testing NYX Eyeshadow Base in Skintone which I bought not too long ago. The colour looks nothing like that as the photo taken by NYX website (above).


The NYX Eyeshadow Base comes in a plastic jar with a white cap. The colour is a orangy beige colour that looks darker than NYX Concealer in A Jar in Beige. It is lighter when applied. It is a really creamy base which I had no problem blending but it dries fast when applied so you have to work fast.

On NC25 skin, it has an obvious orange tinge in swatches. As the base can be blended, you can just apply a thinner layer to make it less obvious. When applied on my eyes, the orange tinge wasn't that obvious for me. As I have dark shadows on my eyelids (due to thinner skin ), this eyeshadow base really helps in concealing and correcting all the darkness on the eyelids that I want to be gone. It glides on really smoothly and smoothes the creases on the eyes for me. I find it easy to blend out. The base goes on, giving a sheer coverage.

As a eyeshadow base, I really do not find that it intensifies eyeshadows as stated. You do get colour payoff compared to not using any base or primer but I find it to be average. You might get better payoff working with a good eyeshadow primer instead. There was something I did not like about how the eyeshadows turned out after applying over this base. I couldn't put a finger to it and so I did several swatch tests of this with E.L.F Mineral Primer, L'Oreal De-Crease Primer, Urban Decay Primer Potion, NYX Jumbo Eye Pencil in Milk (yes, I have that many. Too bad I have no pictures for this because my camera has broken down). So in short, although colour payoff for eyeshadow applied over this NYX eyeshadow base was decent, there were some colours that didn't turn out the way they should. I had problems with colours that were reddish copper or burgundy purple that turned up darker or more brownish. I believed it's due to the orange tinge in the base affecting it. Somehow the base darkens some of the colours instead of intensifying it.

Overall, I'm not really liking this product as an eyeshadow base to apply eyeshadows over. It is kind of dark. It works fine for me but probably wouldn't work for someone who's fairer than NC25. If you have perfectly fine eyelids (no dark shadows), using it will leave your eyelids looking orange which is pointless. However, I really like how it corrects all the darkness on my eyelids. I would probably use it on days when I don't feel like wearing eyeshadow, just to make the area around my eyelids look less dark. Another use I've found for it is probably as an undereye concealer. Even though coverage for this is sheer, it does help to conceal a little bit of dark eye circles. I suppose it works well as a "orange" corrector and since its consistency is really smooth, it doesn't make the undereye area look dry.

As most cream bases crease on me, usually i would use eyeshadow primer (to prevent creasing) before applying any cream base over to make eyeshadows stick. As this product doesn't work magic for my eyeshadows, it's really pointless for me to do it this way. You can give it a go with this method if it creases for you or the eyeshadow base in another colour (White and Pearl) works for you.

Item retails for USD $6.00 on Cherryculture.com

Comparision between NYX Jumbo Eyeshadow Pencil in Milk and NYX Eyeshadow Base in Skintone

If you can't decide between the two, maybe this would help. The NYX Jumbo Eye Pencil in Milk has a slightly creamy and sticky consistency. It is opaque white. You can apply on a thick layer to get a white canvas on the lids or blend it out sheer for a sheer wash of base to let eyeshadows stick on. Colours go on vibrantly and it's really good to have as a cream base to work with. The NYX Jumbo Eye Pencil definitely creases if applied on its own. Due to its sticky consistency, it can be hard to blend. Once you pat your eyeshadows on, they wouldn't budge as freely as it normally would (when done without any base).

The NYX Eyeshadow Base in Skintone has a creamy and slightly greasy feel and dries to a clean finish without any stickness. I find it to be easier to blend on top of it as compared to using the NYX Jumbo Eye Pencil as a cream base. In terms of colour payoff, it was a little disappointing since it did not intensify colours as much compared to the NYX Jumbo Eye Pencil.

Sunday, December 13, 2009

Review: NYX The Caribbean Collection - I Dream of Barbados

It's been a while. I'm back to blog.

Am reviewing NYX The Caribbean Collection 5 Color Eyeshadow Palette - I Dream of Barbados.


The palette is really gorgeous. Kindly refer to the original photo taken by NYX as colour shows up more true.

Anyway, I picked up this palette from mscuppycakes.com before they jacked up their shipping rates -pouts- (now I can't get small NYX hauls fast anymore). This palette is love. Totally adore it.

Like the other NYX eyeshadow palettes, it comes with a cardboard packaging. This palette is longer and slimmer than the 10 color eyeshadow palettes which I picked up earlier. Comes with a long mirror and it has 2 eyeshadow applicators instead of only one.

I'm really amazed by the quality of NYX's Caribbean collection "I Dream of Barbados" palette. The texture of the eyeshadow is really fine and creamy and blends beautifully. The 10 color eyeshadow palettes have a good amount of pigmentation but some of the colours just don't work. Some are too glittery and some can be too chalky. So maybe out of 10 colours, you'll only like half or more. Whereas for this palette, I seriously like all 5 colours.

Colours from left to right:
1. ████████ Light muted lavender shade with slight shimmer frost.
2. ████████ Charcoal black with shimmers.
3. ████████ Cool toned pastel pink.
4. ████████ Light silver grey with slight shimmers.
5. ████████ Medium purple with slight shimmer frost.

The purples in the palette are quite muted. Not very loud if you are worried they turn up really garish on the eyes. The colours look matte and the shimmers/frost are really subtle. The black is really easy to work with. It's super dark and blends wonderfully. The cool toned pink brings a pop of colour to the eye though I don't really use it.

Overall I really like this palette. Was able to create smokey look with this. Made my eyes look bigger. Totally adore the texture of the eyeshadows.

If you haven't tried this, go and get one as soon as possible. For the same price, you can pick up either the NYX 10 colors eyeshadow palette or this Caribbean collection 5 colors eyeshadow palette. If you really want a lot of colours to work with, you can pick up the 10 colors eyeshadow palette for variety. However, if you already have a preference of colours you want, for instance you just want a grey smokey or a taupe/brown smokey palette, maybe you can pick up the Caribbean palette instead. I think it offers better quality for lesser amount of eyeshadows (though I only bought one). The 10 colors palette may have 10 colours but I don't see the need to get 3 different kinds of blacks and maybe 5 different greys in one palette. (I need to change my "Lemmings" list. )

It's so good for makeup from day to night. You can use the 3 colours for day and the other 2 colours to darken the eye makeup for night. Really love how compact it is. And yes, I'm planning to get more the next time I buy from NYX again.

Monday, October 19, 2009

Review: E.L.F Studio Single Eyeshadows

Sorry ladies. I've been lazy. I haven't been buying makeup lately because I'm on a makeup ban. But I got myself hooked on buying clothes instead. Left me quite broke. :P

An E.L.F haul/review that I've been forgetting to post.

Oh my god, I sneaked a peek at E.L.F website and they have new items again. :( I want the lip stains. >.< Here's the Single Eyeshadows I bought from the E.L.F Studio line. These come in small packagings. I bought them all except maybe 3 colours.


From bottom left (in clockwise direction):
Coffee Bean, Wild Wheat, Butter Cream, Pebble, Amethyst, Mystic Moss, Charcoal


The colours in the picture above are not true. Refer to the website. It's almost true for all colours except Mystic Moss (which just looks like charcoal grey in the pan).

These eyeshadows are relatively pigmented. Not the best pigmentation but good enough to be used. I tested everything with an eyeshadow primer (L'oreal De-Crease).

Butter Cream: A rather unique shade. It's almost a gold but seems like a creamy yellow shade. Shimmery.
Wild Wheat: A soft brown. Almost like Milo (a chocolate drink). Doesn't really appear on me but great as a all over lid colour.
Coffee Bean: A dark brown with shimmers in it. My favourite. Gorgeous brown as a crease colour.
Pebble: A dark taupe shade with maybe some plums in it. A queer shade. It's too dark of a taupe and too weird for me. :(
Amethyst: Not really a purple. Maybe a plum. Definitely not what it looks like in pictures. It made my eyes look bruised (it might work better if I use a better eyeshadow primer since L'oreal De-crease doesn't really bring out the colours in Amethyst).
Mystic Moss: Supposedly a mossy green but it looks like grey in the pan. Very close to Charcoal except it has some hints of green. I supposed I like it since it's more unique compared to Charcoal.
Charcoal: A dark charcoal grey. Sheer and needs piling. Wouldn't give you that super intense dark grey you would want it to be.

All the eyeshadows have at least a little bit of shimmers in it except for Pebble, which seems matte. I think they are fairly decent eyeshadows. Not fabulous but for the price I paid, I wouldn't mind buying.

Overall, I think they are worth trying out if you like earth toned, more muted eyeshadows. Don't expect vibrant eyeshadows because they really are not. They are really on the dull/muted side but at least they have shimmers. Suitable for work. I would recommend just picking up a few shades to try if you are keen.

I love Coffee Bean a lot. It's my favourite brown. :)

Tuesday, October 06, 2009

Review: L'Oreal De-Crease Eye Shadow Base


I have been using L'Oreal De-Crease Eye Shadow Base for quite a long while. It's my first eyeshadow primer.

L'Oreal De-Crease Eye Shadow Base comes with a doe-foot wand applicator. It comes in only one shade which is said to be suitable for all skin tones. It retails for about US$8.48 (price taken from drugstore.com).

This primer looks similiar to L'oreal True Match Concealer, which I also own (in picture below).


L'oreal True Match Concealer has a liquid consistency while L'oreal De-crease has a slightly thicker consistency. The colour of L'oreal De-crease primer is a light beige shade. When applied, it blends out into a light beige colour over your eyelids making your eyes appear more awake since all the darkness on the lids is concealed. I like to just use this alone on the eyelids when I'm running out of time. I don't think it would work as well for darker skintones as the light beige appears really obvious on the lids so wouldn't really advise darker skintone ladies to just use this primer alone.

I'm really not a fan of this primer. It works really well for me initially and I totally adore how it makes me look so awake when used alone. However, gradually I realised the consistency of it just isn't perfect. There are times when it goes on smoothly and blends to a smooth finish. On unlucky days, it blends out to a blotchy finish, the kind of finish you get when you keep rubbing your concealer and it starts to flake. The primer dries fast and just doesn't blend to an even finish so you get patches of super obvious light beige here and there on the lids.

I hated it. But then of course, being me, I would give it another try again and again. So this review is written after I tried it for maybe 100+ times and still, it's the same. -gives face-

In terms of function, this works all right. It's just.....average. It works in making your eyeshadows appear on your eyelids. However, the colour doesn't intensify. You don't get your shadows as bright as they look in the pans. It lasted a couple of hours for me but I wouldn't recommend it for long wearing or heavy eye makeup.

(I think I'm losing touch with blogging. Just can't seem to find the right words or passion to blog. Or maybe I just hate this product. -lol-)

I'm still using it though. It actually works well for me with brands like Silky Girl (also known as Wet N Wild) eyeshadows, which have pretty and vibrant colours but for some reason, they don't appear all that pigmented for me. Else I'll just use it in the following way:

Primer -> Cream base (thin layer) -> Eyeshadow

You have to use the cream base after a primer else it will just crease like crazy. This works the best for all eyeshadows. At least for me so how the primer works doesn't really matter to me anymore.

I would advise you to save your money and invest in a better eye primer like Urban Decay Primer Potion or Two Faced Shadow Insurance (both retailing for about US$22) if your requirements in a primer is to make the eyeshadows pop, minimize creasing and make it last all day. L'oreal De-crease is really average to me and would be only a good alternative for short durations.

An even cheaper alternative worth considering is E.L.F Mineral Eye Primer (US$3). :)

Sunday, August 09, 2009

New Hauls: NYX Eyeshadow Palettes

So here's the little surprise I just got a few days ago. The new NYX palettes! I only ordered 3. Am wondering if it's enough so whether I should get more. :D hee.

So far I've been excited over these.

I got NYX Runway Collection in Champagne & Caviar, Versus and NYX For Your Eyes Only in For Eye Colour Brown.

The palettes came with a cardboard box packaging. It's pretty neat as the colours are coded at the sides so it's still easier for you to find them even you store them in those cardboard boxes. The compact is in black shiny plastic, not like the matte plastic the NYX trios come in. It's definitely very sleek looking. These palettes were smaller than I imagined to be or from what the photos I've seen online. But it's a pretty handy size for putting into your handbag and purses.

NYX Runway Collection: Champagne & Caviar


NYX Runway Collection: Versus


NYX For Your Eyes Collection: For Eye Colour Brown


Have played with these palettes and they are definitely pigmented and very easy to blend. They show up even without using a primer or cream base. But I would still advise using one to make the colours show even more. Very pleased with them.

Most of the colours work for me except one or two which didn't work or come off right. I do feel that some colours belong to NYX's single eyeshadow colours. So if you already own a lot of their single/trio eyeshadows, you might want to compare whether you have same colours in your stash. Overall, I think they are really good buys for their prices. :D

I'll probably do a detailed review another day. There are quite a few details which need me to focus like colour description (oh...big headache) and I really can't focus now.

In case you are wondering about the size again, here's a comparison made between NYX trio eyeshadow, NYX Jumbo Eye Pencil and the palette. It's about the length of the NYX Jumbo Eye Pencil.


For locals Singaporeans who don't know how long a Jumbo Eye Pencil is, it's about the size of the famous ZA 2-way foundation blue compact. :) Just a weeny smaller and slimmer. :)


Help that helps.

Added:

Link to swatches here. I swear you would want everything after going through i.

Wednesday, July 15, 2009

Tips: Application for Different Eye Shapes

I've been experimenting with the "defining your crease" method on my eyes.
It was all right. It worked for some colours but when I go a little darker on the colours, it got messy. Still trying hard to grasp it.

I don't think it really suits all Asians' eyes (-gives face-).

But if you are interested, here's a pretty good read on it..


Bookmarked from here!

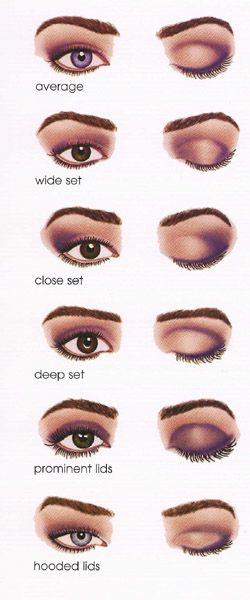
There are 6 basic eyeshapes:
  1. Almond/average Deep Set
  2. Prominent
  3. Wide Set
  4. Close set
  5. Hooded

Then i feel there are a couple more to add that i feel are also pretty basic that i will also throw in:
  • Small
  • Asian
  • Down set

Identification: Looking straight ahead with head straight forward (not tilted up or down) the classifications are as follows.

Almond/Average eyes: this also known in the beauty world as the "perfect eye shape". Basically the proportions of your eye are the ideal quantity of 1/3 lid and 2/3 brow area. So in the mirror if the amount of lid seen is 1/3 of the rest of the eye area above the crease you have almond eyes. Also there is little drooping of the upper or lower lid... like the shape of an almond!

Deep set eyes: with this type of eye, you commonly see that the eye is set back farther into the socket and the brow is extended farther out away from the face. The crease is deep set and often times when you close one eye the crease can still be seen.

Prominent eyes: Many text books call this shape "bulging" eyes but i greatly dislike that term... so i just like to say that with this shape your eyes are the most prominent feature of your face! Usually the eyes protrude from the socket slightly more than most eyes... a great way to determine if you have this eye shape is to place a pencil or brush vertically across your eyebrow and letting it rest on your cheek... if your eye can touch it (or in my case i cant even get the pencil to rest on my cheek without my eye being in the way) you have prominent eyes. In the same sense if your eye doesn't come close to touching the pencil (or your eyelashes bat it) then you have deep set eyes!

Wide set and close set eyes
: Basically everyone is a little wide set or close set... no one has perfectly spaced eyes... but the way you determine whether you are a little wide set or close set is to see if you can fit the length of one of your eyes in between your eyes. Odd sounding i know but take your pinky finger and hold it horizontally under your eye... it should be the same legnth from the tip of your pinky finger to the middle knuckle (not the one closest to your nail or the one closest to your hand) as your eye! then set that across your nose. Line up with the pink of one eye. If your knuckle overlaps the other eye, you are slightly close set, if you have space to spare you have wide set eyes!

Hooded eyes: Unfortunately we all need to know how to apply makeup to this shape generally because it's the shape of mature eyes... in other words as you get older your eyes will start to have this shape. This eye shape is classified as having a fold of eye skin that usually hides the crease diminishing the lid (when looking forward) or all together hides the lid and touches the lash line.

Other types:
Small eyes: usually the eye appears smaller in comparison to the proportions of the face... Usually these eye shapes have little to no crease.
Asian eyes: Not to be confused with small eyes. Asian eyes still have a crease however the lid area is half the size or width of almond eye shapes.
Down set eyes: Also known as "droopy" eyes, the outer corners usually tilt upward for most eye shapes, however with this eye shape the outer corners of the eyes slant downward in a "droopy" fashion... but never fear, this is one of the easiest and most dramatic of fixes!


Application Techniques:

Remember the one rule of thumb- lighter colors bring features forward and into focus, while dark colors push features back and diminish lines.

Almond: This eye shape can pull off any look however the most flattering look for this shape would be a smudged smokey look. Eyeliner on top and bottom smudged to blur and neutral medium shadows for the lid.

Deep set: This eye shape needs little contouring... so though you shouldn't wear too dark of shadows or go heavy with the liner, you can however pull off almost any color! For these ladies i'd suggest liners in many shades like gold, silver, blues and greens. Try to avoid a lot of blacks and dark browns. If you just can't part from the dark liner, be sure to only apply a very thin line to the lashes or just stick to the waterline. Remember the darker colors will only make deep set eyes look even more recessed than they are... light colors will bring them forward and balanced.

Prominent eyes: This eye shadow technique is all about making the lid more diminished. Darker eyesahdows are your friend and will minimize the "bulging-ness" of the eye. However use caution. NEVER go above the natural crease or you will end up with deep set eyes. Also with most prominent eye shapes, the under eye area can cast a shadow making it appear as though you have under eye cirlces, so be sure to stick close to the lash line.

Wide set eyes: with wide set eyes you want to create the illusion that your eyes are closer by creating a crease and liner that widens as it gets closer to the eye. So you want to stay away from cat eye looks and keep the crease color to a minimum at the outer edges of the eye.

Close set eyes: Application is just the opposite! Liner and crease should widen as you reach the outer corners of the eye. Cat eye looks are the perfect answer for this!

Hooded eyes: for many women the technique may seem daunting but as long as you keep to the rule, application will be a breeze! Keep lighter shades at the lash line and under the brow. Medium shades at the inner 1/3 of the lid... and forget the natural crease... apply darker crease colors only on the skin that seems to "hood" over the rest of your lid and blend well... this dramatically diminishes the part of the eye that seems to sag over your lid.

Small eyes: soft looks are the best when it comes to small eyes... dark colors just close the eye area and often lead to making the eyes look even smaller. Use brighter colors and contour with soft shades above the natural crease... this gives the illusion of open bright eyes.

Asian eyes: Liner is your friend! Just make sure its thinner in the center and widens at the outer and inner edges. Keep the colors bright and apply neutral shade for contour at the inner corners of the lid add dimension.

Down set eyes: Lift outer corners by applying shadows and liners that move in upward motion away from the downward edge of the eye... make liner much thicker at the ends and blend crease color into what would be a cat eye on most other eye shapes. add balance by contouring the inner corner of the lid with a darker shadow effect (unless eyes are also close set)


ETA: Now deep set eyes and hooded eyes most likely won't touch the pencil on the pencil method, however the main difference is determined on if the lid becomes covered by the skin above the crease... More often than not hooded eyes will cover 1/3 to over half of the lid when looking forward.

And remember ladies this all just a guideline! All eye shapes are beautiful and when make up is applied right every eye shape can be enhanced!


Other entries:
1. Tips: Eyeliner and Eyeshadow for Different Eye Shapes

Saturday, March 21, 2009

Haul from Robinsons Expo Sale

Went to the Robinsons Expo Sale 2009.


Bought these from Stila. :)


- Eyes and shine - smudge pot trio (Black, bronze, gray) $20
- Single Eyeshadow pan in Cha Cha for $10
- Eyeshadow duo for $10

The eyeshadows were all right. Not very pigmented and rather shimmery. Cha Cha was something I've been wanting to get so I'm kind of glad I got it cheap. It's minty green but has golden shimmers. I find it very pretty for a spring colour. Though I'll probably have to use it wet to get it to show.

The smudgepot trio was a steal. They can be used as eyeliner or eye shadow. However, the eyeliner brush was missing from the box. I wouldn't mind having an extra brush, but after realising the brush is made in China, I didn't really mind after all. :P


A very small picture of the swatches. Pictures didn't turn out clear. Could only savage it by resizing. Top to botom: black, bronze, gray.


The smudge pots are very creamy and soft. Used my own Silk Naturals eyeliner brush (which I didn't really like either for it's too thin) for swatching. Bronze turned out great, very smooth. I didn't really like how black and gray turned out. It was a little uneven and smudgey. But they seemed great for smudging eyeshadow. Very easy to spread and blend.

Overall I'm rather pleased with it. Was planning to get a few more Indelible Gel Liners and Creme Eyeshadows from MAD Minerals. Now I can save some money.

I own only one Indelible Gel Liner in Chocolate Mousse. In comparison, I still prefer Indelible gel liners. Very easy to use. The only problem I have with them is sometimes, will find them too dry or dry up too fast. That's why I don't really want to buy too many of them in one go.

I think I might go down Robinsons Expo Sale again! :D Didn't buy much this time because I wanted to leave before it gets crowded.

Thursday, January 29, 2009

My The Body Shop loot is HERE!

Got super excited when I saw my package today. All thanks to my darling angel who helped me order off the US website! :) :) :)

I'm sorry but I must warn my camera isn't really good.


I bought:
- Cheek Bloom (01 Desert Rose, 02 Dune Pink)
- Duo Eyeshadow (Eucalyptus Grey, Khaki Green )
- Sparkle Eye Palette 02
- Retracable Lip Brush

I got a sample of the Aloe Soothing Day Cream free.


The sparkle eyeshadow palette is from their Christmas collection.


The blushers and eyeshadows are from their Autumn Limited Collection. I swear I have been drooling over the blushers for the longest time. However the Cheek Bloom is selling at SG$34.90 in stores which is way too pricey.

Managed to get it at a good deal. Items were going for 3 for US$10. That's about SG$5 each. :D Of course, shipping doesn't come free. But it's still cheap after shipping.

It's my first time trying out The Body Shop cosmetics. I have heard bad reviews about them but there were some good reviews for these. I only wanted Cheek Bloom but couldn't resist the deal so I bought more. :P~ The lip brush is really soft I wished I bought more. It's still available so maybe if you are interested, you can still grab it. As for the blushers and duo eyeshadows, the packaging is really terrible. I had a hard time opening the casing. The eye palette is really pretty and comes with a mirror and a drawer with a long eye applicator. However, the drawer is a pain to open.

I'm not going to be doing swatches since my camera is just lousy. LOL. If you are keen to know, you can read jojoba's review here (she does great swatches :P) for Cheek Bloom and the Sparkling Eye Palette. Or you can try My Women Stuff's review for Autumn Limited Edition and Cheek Bloom here.